Button Spacer
Button Spacer
Kit Review
Button Spacer
Step By Step
Button Spacer
Extras
Button Spacer
Gallery
Button Spacer
Links
Button Spacer
  Last Update: 18 Feb 06
steps_banner.jpg (8224 bytes)

Backmove.gif (1900 bytes)Ahead

Finishing Details  


step.gif (1063 bytes)

Lay a clear sheet of plastic over the penciled outline of the window opening. Use a ruler and a sharp X-Acto® knife to cut the window 1/8" larger than the outline, as shown.
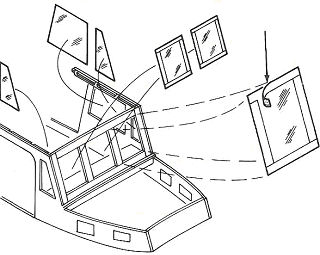


step.gif (1063 bytes)
Apply 1/8" striping tape around the outside edge of the window, as shown. The tape is to be applied to the opposite side of the window that will contact the frame, as shown in the exploded view.


                 Click on image to enlarge

Roger's Notes:  The side windows are to be installed on the inside of the frames. The front windows are to be installed on the outside of the frames, as shown in the exploded view.   On my model I installed them on the inside.


step.gif (1063 bytes)
Apply Walther's "Goo" (or contact cement) sparingly to the edges of the window on the side opposite the striping tape, as shown. Then, press the window into position against the window frame. The Goo will hold the window in position immediately. However, it will take about 24 hours for the Goo to become hard.


step.gif (1063 bytes)
Cut the four cabin side windows about ¼" over­size. Apply Goo around the edge of each window. Press them against the inside of the cabin sides, over the window openings, as shown.


In this section, all of the detail parts will be made and installed. None of these parts are critical to the operation of the model on the water. Their appearance and finish can be altered to give your model individual character and identity. Plus, the can be added at a later time.

Refer to the pictures in your manual that show how these details appear on full-size lobsterboats in Boothbay Harbor!


Windows

The following instructions will shown you how to cut, finish and install one window. All of the windows should be made and installed in the same manner.

You will need the three 4" x 5" pieces of clear plastic sheets from the Accessory Bag to complete this sub-assembly. You will also need a roll of 1/8" wide black striping tape, not supplied with the kit.

Roger's Notes:  If you are unable to locate striping tape, black plastic electrical tape can be substi­tuted. Lay it sticky side down on a clean piece of glass and use a ruler and X-Acto@ knife to cut it into 1/8" wide strips.  To make things even easier, I didn't use any tape on my windows.  I painted the window sills black before I attached the windows.

The illustrations below can be used as a general layout guide for locating the windows on the plastic sheets.


step.gif (1063 bytes)
Cut a piece of stiff paper to fit over the window opening. Hold it behind the window frame and trace around the window


Model Marina Web Site © Copyright 2006 RKTMAN  All rights reserved.
Web site Designed & Maintained By RKTMAN

Dumas Logo and materials Copyright Dumas Products, Inc. - Used with permission.
Model Slipway Logo and materials Copyright Model Slipway - Used with permission.
Midwest Logo and materials Copyright Midwest Products, Inc. - Used with permission.