banner.jpg (8927 bytes)
Button Spacer
Button Spacer
Kit Review
Button Spacer
Step By Step
Button Spacer
Extras
Button Spacer
Gallery
Button Spacer
Links
Button Spacer
  Last update: 27 Aug 06
steps_banner.jpg (8224 bytes)

HOW TO USE THIS AREA:

  This page will highlight the many areas of construction for this kit.  All of the areas fall under the following five main areas, Hull & Running Gear, The Superstructure, Fittings, Electronics & R/C Gear and Painting. Super Detailing is covered in another area called "EXTRAS". The directions that follow were modified form the printed directions that were included in my AZIZ kit.  I have also included my own notes along with the many assembly pictures and diagrams that follow.   As I get more pictures ready, I will add them along with any comments to the following pages.


BEFORE YOU BEGIN:

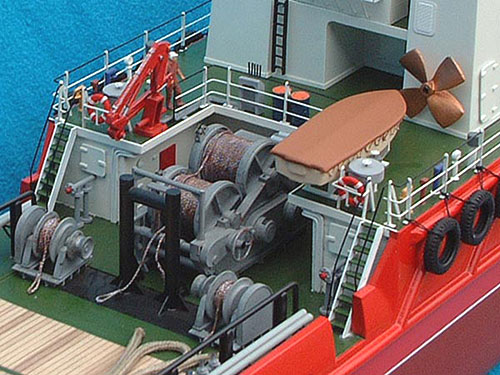
  This is a very large tug kit with a limitless number of detail items that can be added to this model tug.  Since this is a
1/50th scale kit, it's easy to find extra detail parts to add to your tug.  It comes down to this, you are only limited by your imagination.  Time should be set aside to think about any extra detail items that you may wish to add to this model before you start the construction process.  This time set aside to plan ahead can save you added aggravation later in the assembly process.  I suggest that you write down a list of the added items you wish to add to your tug and then you can make the appropriate plans for their addition during the assembly process.

inv_spacer.gif (807 bytes)
Planning To Build:
It all starts here...
Modified Towing Post
Tools
Glues
Fillers
Die-Cut CNC Cut Parts
Printed Parts
Bending A Styrene Part
Dowels
White Metal Fittings

Painting
 
The Hull & Running Gear:
Starting to Build

Model Stand
Hull Preparation
Motor Preparation
Fitting the Running Gear
Planning the Radio Gear
Deck Supports
Rear Deck Assembly
Bulkheads
Foredeck Assembly
Rear Deck Bulwarks & Cable Roller

            Click on image to enlarge


                 Click on image to enlarge


 Pictures courtesy of Model Slipway - Used with permission.
The Superstructure:
Main Mast Assembly
Miscellaneous items
Glazing inv_spacer.gif (807 bytes)
Fittings:
White Metal Fittings
Waterfall Wench
Tugger Wenches
Anchor Windlass
Deck Crane
Fire Monitors
inv_spacer.gif (807 bytes)
Electronics & R/C Gear:
- Installing the motors
- Installing the ESC's
- Using the Harbor Models Power Distribution Panel
-
 
Painting:


Model Marina Web Site © Copyright 2006 RKTMAN  All rights reserved.
Web site Designed & Maintained By RKTMAN

Dumas Logo and materials Copyright Dumas Products, Inc. - Used with permission.
Model Slipway Logo and materials Copyright Model Slipway - Used with permission.
Midwest Logo and materials Copyright Midwest Products, Inc. - Used with permission.